You can adjust the display region within the four directions of the screen. You can finish the task by resorting to the Sony VPL-XW6000 Projector’ screen blanking setting.
Steps to set up screen blanking on Sony VPL-XW6000 Projector
- Press the MENU button.
- Select
 [Screen] – [Blanking] – [On] or [Off].
 - When you select [On], adjust the blanking.
- Press the
 /
/ (Up/Down) button to select the desired range from [Left], [Right], [Top], or [Bottom].
 - Press the
 /
/ (Left/Right) button to adjust the amount of blanking.
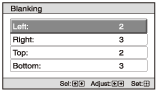
- Press the
- Depending on the aspect setting, right/left blanking may not be available.
- Blanking setting is saved for each of the three Picture Positions. Select the Picture Position before adjusting the blanking. Final adjusted values are saved automatically. (VPL-XW7000/VPL-XW6000)
Read more:
Sony VPL-XW6000 Projector Brightness Adjustment Guide